Craver Integrates with Star Printers with ReceiptPRNT Technology.
In this How-To document, we will walk you through the steps you need to take to be set up and connect your Star printer with the Craver platform.
Prerequisites
Craver platform only integrates with Star printers with ReceiptPRNT Technology. If your printer does not have this technology, it cannot be integrated with the Craver platform.
Your Star printer needs to be connected to the internet, via LAN only (ethernet cable), to receive orders from the Craver platform.
Setup Your Printer
Connect your printer to the Internet via LAN cable and turn it on. It should print out your Network Configuration slip with a QR code at the bottom. On this page, you can see much information such as your Star ReceiptPRNT status as well as your Current IP Parameters Status.
To initiate a re-print of your Network Configuration slip, follow these steps:
- Make sure the printer is connected to the Internet via LAN
- Turn off the printer
- Hold the Feed button
- While holding the feed button, turn on the printer
- Keep holding the feed button until the printer prints out the Network Configuration slip.
Set Star ReceiptPRNT Settings
In order to change your ReceiptPRNT settings, you need to use a computer that is connected to the same network as your printer. Using that computer, follow these steps:
- Open a browser (Chrome, Firefox, Internet Explorer or Safari)
- Type in the IP address from the bottom of your Network Configuration slips in the address bar and hit enter. In our example, the IP address is 192.168.1.56
3. This should open your printer’s Network Utility page.
4. Click on login and use the default username and password of your printer. For many models of Star printers, the default username is the root and the default password is public.
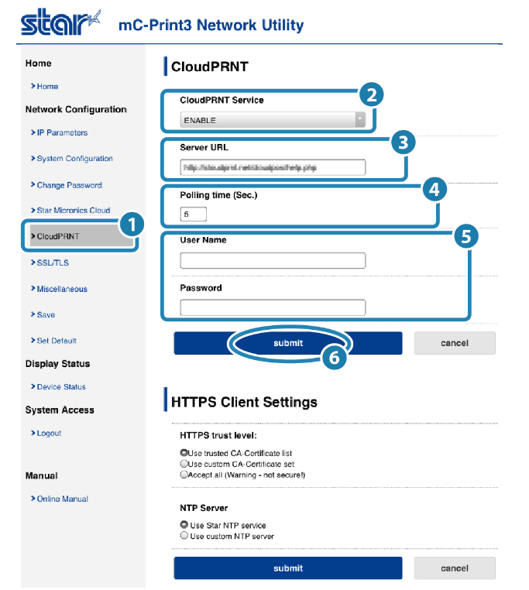
5. You should see the Network Configuration section in the left panel.
6. From that panel, select CloudPRNT.
7. In the CloudPRNT section you should see 5 entry fields:
– CloudPRNT Service
– Server URL
– Polling Time
– User Name
– Password
8. Enter the values provided to you by the Craver support team. If you don’t have access to your CloudPRNT settings, please contact support.
9. Press Submit
10. Your CloudPRNT printer is now set up and you can receive your Craver orders on the printer now.
Troubleshooting
I can't connect my printer using WIFI/Bluetooth
Currently connection via LAN and WIFI is supported.
We started supporting WIFI MODEL , here are 2 printers we do support :
MC-3 Printer - This one is using LAN
TSP143IV UEWB Printer - This one has WIFI
I can’t see CloudPRNT in Network Configuration Panel
If your printer has ReceiptPRNT technology and you don’t see the ReceiptPRNT in the Network Configuration Panel, it’s possible that you need to update your printer’s firmware.
You can find how to upgrade your printer’s firmware from your printer manual. For mC-Print printers, you can use this link:
https://www.star-m.jp/products/s_print/mcprint3/manual/en/settings/usingApp.htm
My printer is set up, but I don’t receive orders
Contact support if you have followed all the steps here but you don’t receive your orders. Please note, the ReceiptPRNTshould be enabled by Craver for your app. If you haven’t notified us that you would like to use this integration, it will not be enabled and you will not receive orders on your printer.
I have multiple locations, what should I do?
You will receive one set of settings for each location of your restaurant or cafe. Make sure to enter the correct credentials when you are setting up your ReceiptPRNT printer.
Which paper rolls are compatible with the printer?
https://starmicronics.com/help-center/knowledge-base/my-star-micronics-thermal-printer-feeds-paper-but-does-not-print/?srsltid=AfmBOopXI47dhUrQqNIYCztqkCQwLy7bq1rYfGSQ8lABw3azFdSKcmlh
Here's a list of recommended paper rolls.
